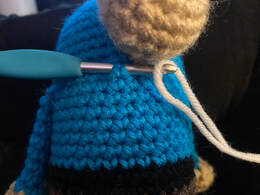
Who doesn't love gnomes? Gnomes have been growing in popularity as decor pieces over the years, and there are so many different ways to style them. I've seen bee gnomes, farmer gnomes, santa gnomes..... way too many to list. These are all cute, but I think my favorite will always be the classic gnome wearing his red hat, blue jacket, and brown pants. I've designed this gnome to be easy for little hands to grasp and play with, or just to have sitting around on a shelf. Both the gnome and mushrooms are weighted on the bottom to provide stability. This helps them to sit upright without toppling over. I used river rocks from Dollar Tree, but you can find bags of stones at any craft store. IF YOU WOULD LIKE AN AD-FREE PRINTABLE VERSION OF THIS PATTERN, PLEASE HEAD OVER TO MY RAVELRY SHOP BY CLICKING THIS LINK: https://www.ravelry.com/patterns/library/gnome-and-toadstool-set Supplies Needed: -4.5mm crochet hook -Yarn needle -Scissors -Red Heart Super Saver yarn in red, blue, brown, black, flesh tone, and white - polyester fiberfill stuffing -cardboard -river rocks or something small and heavy Abbreviations Used (American Terms): Sc= single crochet Ch= chain SlSt= slip stitch Dec: decrease MC= magic circle Inc= increase (work 2 stitches into the same stitch) Notes I always prefer to start projects worked in the round with a magic circle. If you do not prefer this method, simply chain 2, and begin working into the 2nd ch from the hook. GNOME Black Round 1: 6sc in a MC (6) Round 2: incx6 (12) Round 3: sc,inc. Repeat around. (18) Round 4: scx2, inc. Repeat around. (24) Round 5: scx3, inc. Repeat around. (30) Round 6: scx4, inc. Repeat around (36) Trace the piece you just made onto some cardboard, and cut it out. Trim the cardboard piece down so it is just slightly smaller than the crocheted piece you just made. Round 7: BLO, sc around. (36) Rounds 8&9: sc around (36) Change color to brown. Rounds 10-17: sc around (36) Change color to black. Rounds 18&19: sc around (36) Put the piece of cardboard you cut out into the bottom of the gnome, and press it flat. Change color to blue. Rounds 21-35: sc around (36) Place a handful of stones or fish gravel in the body, and start stuffing. Round 36: scx4, dec. Repeat around. (30) Round 37: scx3, dec. Repeat around (24) Round 38: scx2, dec. Repeat around. (18) Round 39: sc, dec. Repeat around (12) Round 40: decx6 (6) Finish off. Leave a long tail for sewing. Sew the top of the body closed. HAT Red Round 1: scx6 in a MC (6) Round 2: sc around (6) Round 3: sc,inc. Repeat around (9) Round 4: sc around (9) Round 5: scx2, inc. Repeat around. (12) Round 6: sc around (12) Round 7: scx3, inc. Repeat around. (15) Round 8: sc around (15) Round 9: scx4, inc. Repeat around. (18) Round 10: sc around (18) Round 11: scx5, inc. Repeat around. (21) Round 12: sc around (21) Round 13: scx6, inc. Repeat around. (24) Round 14: sc around (24) Round 15: scx7, inc. Repeat around. (27) Round 16: sc around (27) Round 17: scx8, inc. Repeat around. (30) Round 18: sc around (30) Round 19: scx9, inc, Repeat around. (33) Round 20: sc around (33) Round 21: scx10, inc. Repeat around. (36) Round 22: sc around (36) Round 23: scx11, inc. Repeat around. (39) Round 24: sc around (39) Round 25: scx12, inc. Repeat around. (42) Rounds 25-28: sc around (42) Finish off, leaving a long tail for sewing. NOSE Flesh tone Round 1: scx6 in a MC (6) Round 2: incx6 (12) Round 3: sc, inc. Repeat around. (18) Rounds 6-8: sc around (18) Round 9: sc, dec. Repeat around. (12) Round 10: decx6 (6) Finish off, leaving a long tail for sewing. Stuff the nose. ARMS Very lightly stuff the hands, but not the arms. Flesh tone Round 1: scx6 in a MC (6) Round 2: incx6 (12) Round 3: decx6 (6) Change color to blue. Rounds 4-11: sc around (6) Finish off, leaving a long tail for sewing. Assembly: Step 1: Stitch the nose to the body, starting at row 28, and working up towards the top of the piece. 2: Stitch the arms to the body, between rows 28&29. 3: Cut pieces of white yarn, roughly 5 inches long. Fold in half, put your hook into a stitch close to the nose, grab the folded edge of the yarn, pull it through the stitch, and pull the ends of the yarn through the loop. (Refer to photos.) Use as many strands of yarn as you like to fill out the beard. You may leave the yarn as is, or separate the strands, and comb them to make them appear fuller. 4: Stitch the hat to the gnome.
Toadstool Red Round 1: 6sc in a MC (6) Round 2: sc, inc. Repeat around. (9) Round 3: scx2, inc. Repeat around. (12) Round 4: scx3, inc. Repeat around. (15) Round 5: scx4, inc. Repeat around. (18) Round 6: scx5, inc. Repeat around. (21) Round 7: scx6, inc. Repeat around. (24) Round 8: BLO scx2, dec. Repeat around. (18) Rounds 9-11: sc around (18) Change color to white. Round 12: BLO scx2, dec. Repeat around. Scx2 (14) Begin stuffing the mushroom cap. Round 13: scx2, dec. Repeat around. Scx2. (11) Rounds 14-16: sc around (11) Round 17: BLO sc around (11) Rounds 18-22: sc around (11) Round 23: scx2, inc. Repeat around. Scx2 (14) Round 24: sc around (14) 25: sc, inc. Repeat around. (21) 26: sc around (21) Finish off. Stuff mushroom. Stalk ruffle Hold the mushroom so the cap is facing you. Join white with a slip stitch in one of the front loops from round 14. Round 1: ch1. 3 sc in each stitch around. Finish off. Mushroom base Round 1: 6sc in a MC. (6) Round 2: inc around (12) Round 3: sc, incx3, Sc, incx3, sc, incx3 (21) Finish off, leaving a long tail for sewing. Cut out a piece of cardboard slightly smaller than the mushroom base. Place a few river stones (you can get these in bags at the dollar tree) and the stalk of the mushroom. Using a yarn needle, begin to sew the base of the mushroom on to the bottom of the stalks. Slip in the piece of cardboard, and finish stitching on the base. Now we are going to shape the top of the mushroom. Using a long length of white yarn and a yarn needle, insert the needle two rows below where the red cap ends. Bring the needle up to a row above the BLO row on the cap, Skip a stitch, then bring the needle back down. Pull your yarn slightly tight, to give shape to the mushroom. Tie a knot. Work your way around the cap of the mushroom in this fashion to add spots, and give the mushroom shape. Do not finish off. (Refer to photos) Red Hold the mushroom so the cap is facing you. Join red with a slip stitch in one of the front loops from round 8. Ch 1. Rounds 1-4: sc around (24) Finish off. Using white yarn and yarn needle, continue stitching spots onto the remainder of the cap of the mushroom. Finish off. Notes: To make a taller or shorter mushroom, make more or fewer rows for the stalk (rows 18-22 in the written pattern) Enjoy! All photos and text are copyright Amber Dawn Riley, 2022. All rights reserved. Yes, you may sell anything you make using this pattern, as long as it is not commercially produced. You may not rewrite the pattern and claim it as your own. 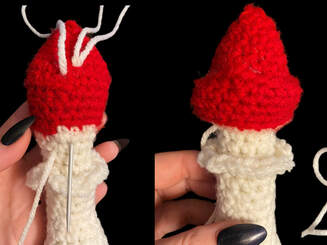
1 Comment
|