Welcome, Ya'll
  • Home
  • Free Printables
    • Rainbow Bridge Printable
    • Religious Printables >
      • Religious Bookmarks
    • Christmas Printables >
      • Product Reviews
      • Christmas Bookmarks
      • Santa Letter Set
    • Budget Planners
  • Recipes
    • Breakfast
    • Lunch
    • Supper
    • Beverages
    • Snacks
    • Dessert
    • Sides
  • Crafts/DIY
    • Valentine's Day
    • Spring Crafts
    • Fall Crafts
    • Halloween
    • Basic Body Care Recipes
    • Sewing
    • Christmas
    • Wreaths
    • Everyday Crafts
    • Crochet
    • Resin Crafts
  • Articles
    • Cleaning
    • Gardening
  • About

CROCHET

Planned Pooling with Red Heart Zebra

9/19/2016

29 Comments

 
Picture
Picture
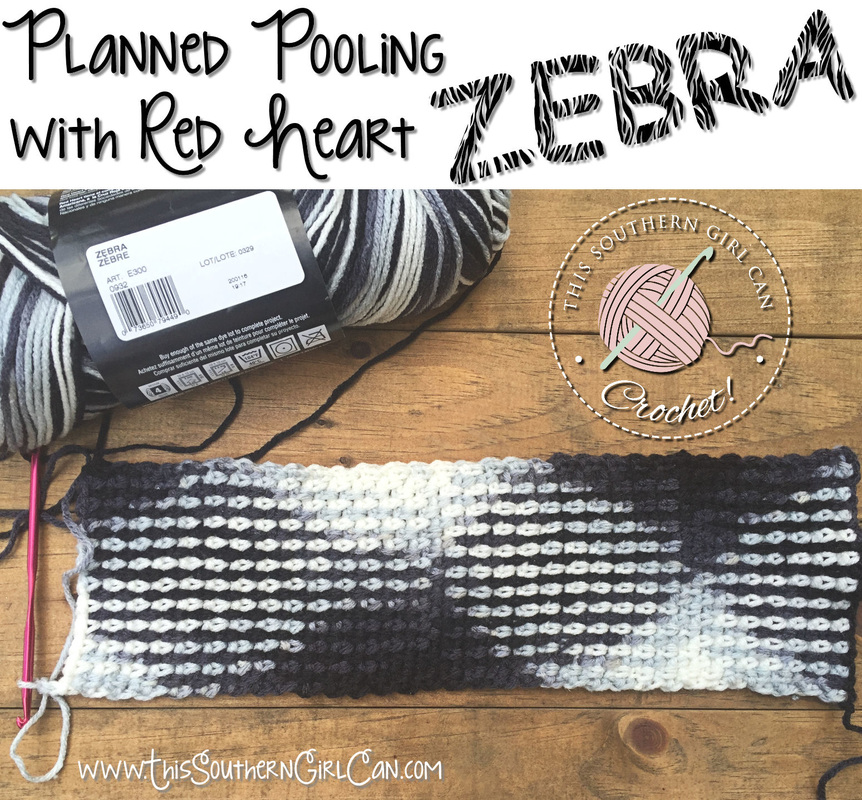
Planned pooling is not a new concept. I can remember my grandmother working with her variegated yarns in various ways until a design emerged from her stitches. If you have never heard this term used before, you may be wondering: "What is planned pooling?" To put it simply, it is a term used to describe color layouts that surface after working with variegated yarn. As you can see in the photo above, the white tends to 'pool' in certain sections, and the black 'pools' in another. By manipulating count stitch, you can arrange the colors in your yarn to 'pool' in certain patterns.

Planned Pooling Factors
There are so many variables that come into play when crocheting in this fashion. I will try to explain everything I have learned about this technique so far. If I have left anything out, please feel free to let me know your tips and tricks in the comments below.

1. First, yarn tension is important. Some patterns will emerge when your stitches are a little looser, some when they are slightly tighter. Of course, this can be achieved by simply changing to a different hook size, but if you're like me, you don't have a lot of hooks lying around. I try to keep a medium tension on my yarn, and have found this gives the best result.

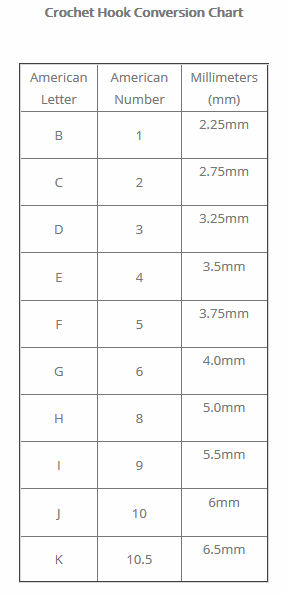
2. Play around with your hook size and stitch count. I usually use either a size 4.5 mm (Size 7), or a 5.0 mm (Size H) hook. A 5 seems to give the best result. For your stitch count, it seems that anywhere from 24 to 32 beginning chain stitches is the magic number, although I have read that you may need to chain up to 36.  Because each color of yarn will be different, your beginning chain count will vary.

3. Always start at the beginning of a color change. I have found that making your initial slip stitch at the very beginning of a color change gives the best results.

4. You may need to work up to 10 rows before you can see the pattern emerging. If you don't see it by then, you need to start over and either change your hook size while keeping your initial chain count, or keep the same hook and either increase or decrease your starting chain count. I usually start with a chain count of 32, then start over and decrease if the pattern doesn't start coming through.

5. A few stitches will work with this technique, but I have found the best to be the Linen stitch. This has also been called the Moss stitch, and the Granite stitch, but I will refer to it as Linen. Although they look similar, there is a slight difference in how you work each one. I have found a Linen stitch provides the best, most consistent, results. If you don't know how to do this stitch, I have found a wonderful tutorial that I will link to below.

How To Do It

Now, I will show you how I achieved the look in the photo above using Red Heart Super Saver yarn in the color Zebra to make a wonderful scarf.

1. First, I used a size 4.5 mm (7) hook. I also pulled a bit of the yarn out of the skein until I found a place where it faded from gray into black. I made my slip knot right on the mark where the yarn turned black. I always like to start at the very beginning of a color change. You could also start where the yarn turns gray or white, whichever you prefer. Just try it and see what works best for you.

2. Keeping a medium tension on my yarn (not overly tight, but not too loose), I chained 24. I then began my Linen stitch as instructed in the video. The only thing I did differently was I started my second row in the 4th chain from the hook. Not the second. I don't know why, it's just the way I was taught.

3. After about 5  rows, I really began to see the pattern taking form. I simply kept working until I had my scarf.

And there you have it! This is how I have come to understand planned pooling. If you have anything you would like to add, or any helpful tips or tricks, please comment below!
29 Comments
Shirley Cummings link
9/19/2016 04:10:57 pm

When you are doing this stitch, when you get to the end of the row, do you chain one and start in the second stitch again?

Reply
This Southern Girl Can
9/19/2016 04:35:02 pm

I chain 2, turn, and then start again in the chain 1 space from the previous row.

Reply
Marisa
9/19/2016 05:00:36 pm

How do you continue with a new skein without messing up the pattern?

Reply
This Southern Girl Can
9/19/2016 05:19:28 pm

That can be tricky, but I make sure to have a about a foot or two of yarn left before I start another skein. Then I pull enough yarn out of the new skein to match the color pattern of what I ha e left coming off of my work, then attach it at the end of a row.

Reply
BettyLou link
9/19/2016 05:11:24 pm

Great post on color pooling, with everyone trying to piece all the variables of pooling together, it is nice of you to post your findings. Do you mind if I link back to you or recommend your blog to others having trouble?

Reply
This Southern Girl Can
9/19/2016 05:20:30 pm

You may share it all you like! I really do appreciate the support!

Reply
Jen
9/19/2016 07:47:32 pm

Can you make an afghan using this method or is it only good for scarves?

Reply
This Southern Girl Can
9/23/2016 07:00:24 am

You would just have to play around with the yarn and do a bit of math, but I believe you could do an afghan. Here's how you can make a wider piece though. To get a wider section, try this: once you find that magic number of starting chains that allow the pattern to form, write it down. I begin my stitches in the fourth chain from the hook. So , take your number of starting chains, and subtract 4. Now add that number to your starting chain number, and that should let you get a wider pattern. You may have to adjust it just slightly, but it will give you a good starting point. Let's say 20 starting chains is what you need for the pattern to form. Subtract 4. That gives you 16. Add 16 to your original 20, for a total of 36 starting chains.

Reply
Jen Lacasse
9/25/2016 03:15:18 pm

Thanks so much! I'll give that a try.

Tamra Smith
9/22/2016 12:33:54 pm

I would love to "pool' but on a larger scale..like a blanket. Any tips to accomplish this?

Reply
This Southern Girl Can
9/23/2016 06:59:10 am

Hey there. Try this. To get a wider section, try this: once you find that magic number of starting chains that allow the pattern to form, write it down. I begin my stitches in the fourth chain from the hook. So , take your number of starting chains, and subtract 4. Now add that number to your starting chain number, and that should let you get a wider pattern. You may have to adjust it just slightly, but it will give you a good starting point. Let's say 20 starting chains is what you need for the pattern to form. Subtract 4. That gives you 16. Add 16 to your original 20, for a total of 36 starting chains.

Reply
Susan
9/22/2016 07:57:06 pm

Hello, I think you are working back and forth on 22 stitches, that seems like a skinny scarf to me. how can you achieve a wider zepra pattern , may an argyle or plaid. thanks much

Reply
This Southern Girl Can
9/23/2016 06:58:11 am

I can't stand bulky scarves, so I make mine on the skinny side. But, to get a wider section, try this: once you find that magic number of starting chains that allow the pattern to form, write it down. I begin my stitches in the fourth chain from the hook. So , take your number of starting chains, and subtract 4. Now add that number to your starting chain number, and that should let you get a wider pattern. You may have to adjust it just slightly, but it will give you a good starting point. Let's say 20 starting chains is what you need for the pattern to form. Subtract 4. That gives you 16. Add 16 to your original 20, for a total of 36 starting chains.

Reply
Kristin morrill
9/23/2016 12:43:25 pm

Have you tried doing this particular Zebra yarn with 36 stitches and 5mm hook? Does it pattern the same way ?

Petra Farmer
9/24/2016 04:41:00 pm

I tried and frogged about a dozen times. I was just about ready to throw it all out of the window when I came upon 20 starting chains with a 3.75 hook. That finally gave me the pattern using the zebra yarn. All I can say is don't give up but, do write it down once you find what works for you.

Reply
Azthreads
9/29/2016 02:40:02 am

In your first row can you tell us how many stitches if each color you have. Ex: 9 black 10 grey 15white etc across your first row

Reply
Jennifer j
9/29/2016 07:41:57 pm

Great work and post! So I treated myself to a skein of RSS in blacklight got it home and found 1 tutorial on how to get the pooling or argyle effect with it. Chaining 185. Her scarf is gorgeous but really there are so many different color changes and lengths it's hard to determine the color on which to begin! Got any ideas?

Reply
yaya
9/30/2016 09:35:37 am

Does this work with multi colored yarn?

Reply
Nadine
9/30/2016 05:56:01 pm

The reason you start in the 4th chain is that is your first stitch and your first ch 1

Reply
Kayleigh
10/2/2016 10:07:07 am

After trying all my red heart multi colors, including the zebra pattern I thought it wouldn't work. I was continuing from gray to white to black and stopping at gray again instead of just gray to white. But using a 7 hook (4.5mm) I got it going starting with 24 chains. I'm going to play around with some more colors and see what I get with this pattern ♥️

Reply
lourdes melo
10/12/2016 11:27:11 am

i loved your comments

Reply
Polly
11/5/2016 11:16:50 am

I'm having trouble finding this hook you are using. My G/6 hook is a BOYE hook and a number 4.25. Please advise me to where I can purchase a number 7 hook 4.50. Having lots of trouble making any yarn work. So I'm assuming it's my hook. Please help because I'm determined to make this.

Reply
Yolanda
11/21/2016 04:20:22 am

After two solid weeks of trying all the different instruction videos on color pooling, when I came across yours I thought finally a simple one how could I fail. I don't know why but not one attempt I've tried has come out. I'm behind on Christmas gifts because of spending so much time on this. I will have to try after the holiday.

Reply
Yolanda
11/21/2016 06:29:16 am

Reply
Lorraine Jackson
12/2/2016 02:25:54 pm

I got the Redheart zebra to pool. Thank you

Reply
Yolanda
12/2/2016 05:00:54 pm

Congratulations Lorraine! How did you do it?

Reply
Llinos
12/4/2016 01:04:43 am

Would this work with the super bulky red heart yarn? I'd like to make an afghan.

Reply
Melanee link
1/1/2017 08:04:25 am

Took me around 20 try's then finally got good

Reply
Marilyn link
3/6/2017 02:53:46 pm

I tried and tried to color pool with zebra. I spent hours trying to figure out why it didn't work for me! I got so frustrated but I kept at it. I googled and read all the websites that showed how to color pool Kayleigh (10-02-16 above) saved the day. I did what she did and it worked out! I could not believe it worked out so easily. Thank you!

Reply


Leave a Reply.

    Archives

    September 2022
    August 2022
    July 2022
    June 2022
    May 2022
    September 2021
    February 2021
    September 2020
    August 2020
    June 2019
    October 2017
    August 2017
    July 2017
    May 2017
    November 2016
    October 2016
    September 2016
    December 2014

Home
About
Contact
This Southern Girl Can is a participant in the Amazon Services LLC Associates Program, an affiliate advertising program designed to provide a means for sites to earn advertising fees by advertising and linking to Amazon.com.
  • Home
  • Free Printables
    • Rainbow Bridge Printable
    • Religious Printables >
      • Religious Bookmarks
    • Christmas Printables >
      • Product Reviews
      • Christmas Bookmarks
      • Santa Letter Set
    • Budget Planners
  • Recipes
    • Breakfast
    • Lunch
    • Supper
    • Beverages
    • Snacks
    • Dessert
    • Sides
  • Crafts/DIY
    • Valentine's Day
    • Spring Crafts
    • Fall Crafts
    • Halloween
    • Basic Body Care Recipes
    • Sewing
    • Christmas
    • Wreaths
    • Everyday Crafts
    • Crochet
    • Resin Crafts
  • Articles
    • Cleaning
    • Gardening
  • About