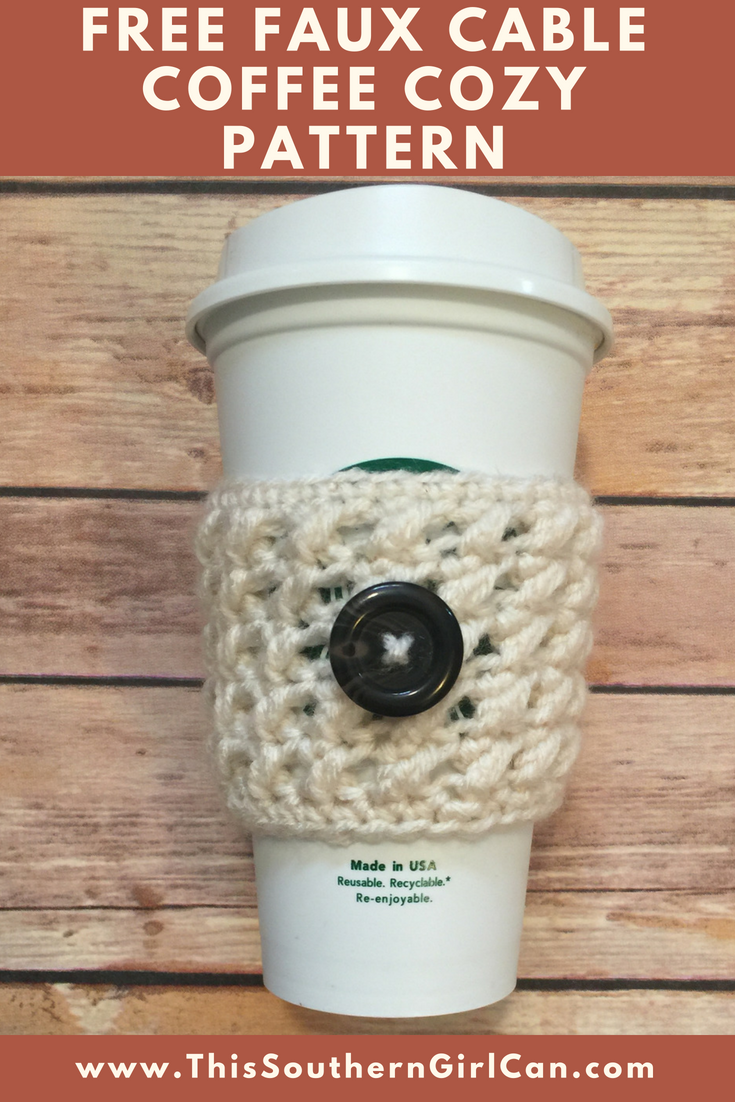
Cooler weather means warm sweaters, fluffy scarves, and cups of steaming pumpkin spice lattes. Ok.... If you're like me, you drink pumpkin spice lattes all year round, but most people tie those into the Fall season. Since everyone is breaking out their sweater stash, why not whip one up for your latte as well?
I call this my 'Faux Cable' coffee cozy because the stitches sort of resemble those on a cable-knit sweater. These are so quick and easy to whip up, and they make excellent gifts for coworkers. If you set up at craft fairs, these also sell pretty quickly. Also, because I'm a kind, sweet, generous ray of sunshine that adores her readers, I created a free coffee cozy printable to use when gifting or selling these little gems. Check it out here: FREE COFFEE COZY TEMPLATE
Ok. On to the pattern. VIDEO TUTORIAL AT THE BOTTOM OF THE POST
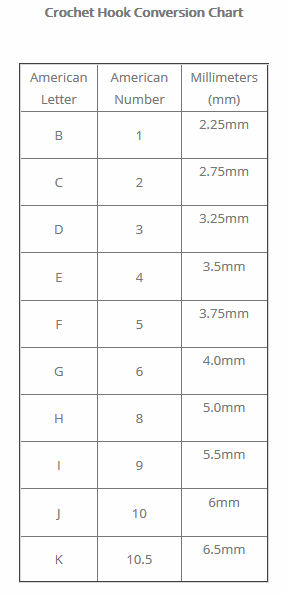
What You Need: yarn (I use worsted weight, but you can use cotton as well) a size 5.0mm hook scissors Optional: a button, a tapestry needle Stitch Abbreviations: Ch: Chain Slst: Slip Stitch Sc: Single Crochet DC: Double Crochet St: Stitch Sk: Skip Foundation: Ch 30. Join with a slst to the first ch to make a loop. Row 1: Ch1. Sc in same st, and each st around. Join to first sc with slst. NOT the chain. (30 sts) Row 2: Ch2. [Sk next st, DC in next st, DC in skipped st, making sure to work the second DC behind the first] Repeat 14 more times. Join to top of first DC with a slst. NOT the starting chain. (15 X's) Row 3: Repeat row 2. Row 4: Repeat row 2. Row 5: Repeat row 2. Row 6: Repeat row 2. Row 7: Ch1. Sc in same stitch, and each stitch around. (30 sts). Finish off and sew in ends. If you want, sew on a button to dress it up a bit. That's it! Feel free to make and giveaway or sell as many of these little darlins as you like.
0 Comments
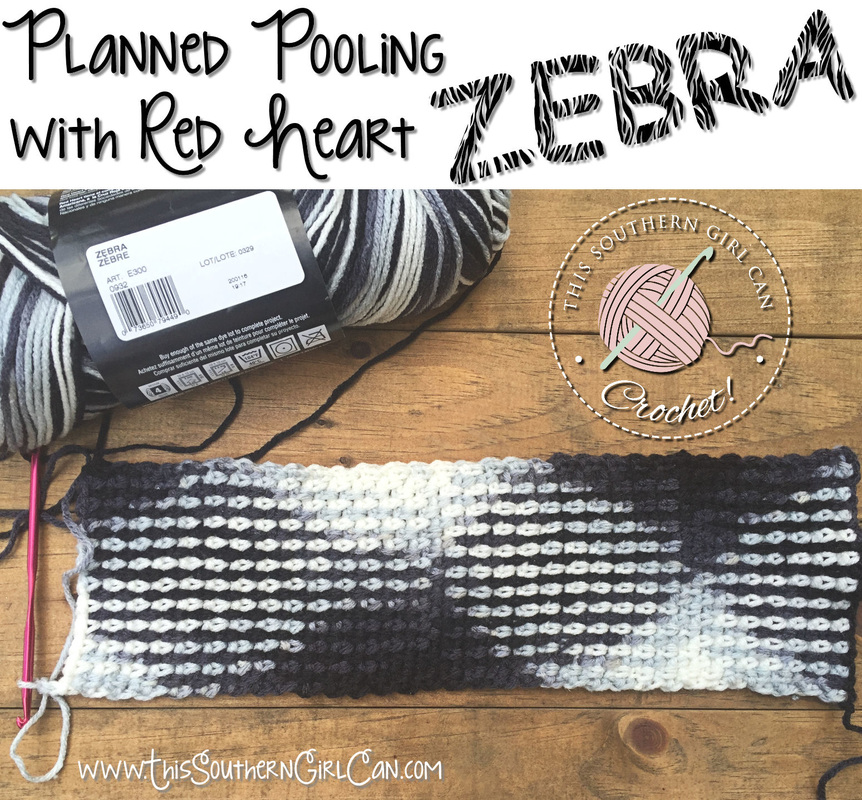
Planned pooling is not a new concept. I can remember my grandmother working with her variegated yarns in various ways until a design emerged from her stitches. If you have never heard this term used before, you may be wondering: "What is planned pooling?" To put it simply, it is a term used to describe color layouts that surface after working with variegated yarn. As you can see in the photo above, the white tends to 'pool' in certain sections, and the black 'pools' in another. By manipulating count stitch, you can arrange the colors in your yarn to 'pool' in certain patterns.
Planned Pooling Factors There are so many variables that come into play when crocheting in this fashion. I will try to explain everything I have learned about this technique so far. If I have left anything out, please feel free to let me know your tips and tricks in the comments below. 1. First, yarn tension is important. Some patterns will emerge when your stitches are a little looser, some when they are slightly tighter. Of course, this can be achieved by simply changing to a different hook size, but if you're like me, you don't have a lot of hooks lying around. I try to keep a medium tension on my yarn, and have found this gives the best result. 2. Play around with your hook size and stitch count. I usually use either a size 4.5 mm (Size 7), or a 5.0 mm (Size H) hook. A 5 seems to give the best result. For your stitch count, it seems that anywhere from 24 to 32 beginning chain stitches is the magic number, although I have read that you may need to chain up to 36. Because each color of yarn will be different, your beginning chain count will vary. 3. Always start at the beginning of a color change. I have found that making your initial slip stitch at the very beginning of a color change gives the best results. 4. You may need to work up to 10 rows before you can see the pattern emerging. If you don't see it by then, you need to start over and either change your hook size while keeping your initial chain count, or keep the same hook and either increase or decrease your starting chain count. I usually start with a chain count of 32, then start over and decrease if the pattern doesn't start coming through. 5. A few stitches will work with this technique, but I have found the best to be the Linen stitch. This has also been called the Moss stitch, and the Granite stitch, but I will refer to it as Linen. Although they look similar, there is a slight difference in how you work each one. I have found a Linen stitch provides the best, most consistent, results. If you don't know how to do this stitch, I have found a wonderful tutorial that I will link to below.
How To Do It
Now, I will show you how I achieved the look in the photo above using Red Heart Super Saver yarn in the color Zebra to make a wonderful scarf. 1. First, I used a size 4.5 mm (7) hook. I also pulled a bit of the yarn out of the skein until I found a place where it faded from gray into black. I made my slip knot right on the mark where the yarn turned black. I always like to start at the very beginning of a color change. You could also start where the yarn turns gray or white, whichever you prefer. Just try it and see what works best for you. 2. Keeping a medium tension on my yarn (not overly tight, but not too loose), I chained 24. I then began my Linen stitch as instructed in the video. The only thing I did differently was I started my second row in the 4th chain from the hook. Not the second. I don't know why, it's just the way I was taught. 3. After about 5 rows, I really began to see the pattern taking form. I simply kept working until I had my scarf. And there you have it! This is how I have come to understand planned pooling. If you have anything you would like to add, or any helpful tips or tricks, please comment below! |


