 Granny squares are usually the first thing a person learns to make when they begin their crochet journey. There's a good reason for that: they're so versatile! You can use granny squares to make blankets, pillows, cardigans, and all sorts of other useful items! Below, I'm going go to show you how to create a useful granny square drawstring bag with my free granny square bag crochet pattern. This bag is perfect to take to the beach due to its airy design. You may also line the bag if you like. If you need a video tutorial, please scroll all the way down to the bottom of the post, and click the video. CLICK HERE TO CHECK OUT MY ENTIRE YOUTUBE CHANNEL! Continue scrolling down for the pattern! Granny Square Bag Crochet Pattern Supplies Used: 4.5mm hook Worsted weight yarn (Red Heart Super Saver) Yarn needle Scissors Beads The chain three at the beginning of a row counts as a double crochet. Round 1: Working into a MC: ch 3, 2 dc., ch1, 3dc, ch1, 3dc, ch1, and join to the top of the first chain three with a slst. Tighten MC. Round 2: Slst into the next 2 stitches, and into the ch1 space. Ch3. Dcx2, ch1, dcx3 into the same ch1 space. (Dcx3, ch1, dcx3) into the next ch1 space. Repeat 2 more times. Join to the top of the chain three with a slst. Round 3: Slst into the next 2 stitches, and into the ch1 space. Ch3. Dcx2, ch1, dcx3 into the same ch1 space. Dcx3 in the next ch1 space. (Dcx3, ch1, dcx3 into the next ch1 space. Dcx3 into the next ch1 space.) Repeat 2 more times. Join to the top of the chain three with a slst. Round 4: Slst into the next 2 stitches, and into the ch1 space. Ch3. Dcx2, ch1, dcx3 into the same ch1 space. Dcx3 in the next two ch1 spaces. (Dcx3, ch1, dcx3 in the next ch1 space. Dcx3 into the next two ch1 spaces.) Repeat 2 more times. Join to the top of the chain three with a slst. Round 5: Slst into the next 2 stitches, and into the ch1 space. Ch3. Dcx2, ch1, dcx3 into the same ch1 space. Dcx3 in the next three ch1 spaces. (Dcx3, ch1, dcx3 in the next ch1 space. Dcx3 into the next three ch1 spaces.) Repeat 2 more times. Join to the top of the chain three with a slst. Round 6: Slst into the next 2 stitches, and into the ch1 space. Ch3. Dcx2, ch1, dcx3 into the same ch1 space. Dcx3 in the next four ch1 spaces. (Dcx3, ch1, dcx3 in the next ch1 space. Dcx3 into the next four ch1 spaces.) Repeat 2 more times. Join to the top of the chain three with a slst. (Note: For the remaining rows, you will not be putting two clusters in each corner space. You will only be putting one. This is going to cause your bag to start to curve, and turn into an actual bag.) Rounds 7-10: Slst into the next 2 stitches, and into the ch1 space. Ch3. Dcx2 in the same ch1 space. Dcx3 in each ch1 space around. Join to the top of the chain three with a slst. Change color. Rounds 11-25: Slst into the next 2 stitches, and into the ch1 space. Ch3. Dcx2 in the same ch1 space. Dcx3 in each ch1 space around. Join to the top of the chain three with a slst. Round 26: Ch2. Hdc in each stitch around. Join to the top of the chain two with a slst. Drawstrings (Make 2) Make sure to leave a long tail, about 8 inches, on both ends of your chains. We are going to be stringing some beads onto those. Ch 150. Using a yarn needle, begin to weave one end of your chain in and out through the holes below the half double crochet round. Weave it all the way around your bag, until it comes out one space before the space where the chain went in. Do the same thing with the other chain, but start on the other side of the bag. Thread the ends of your chain through a few wooden beads, and not the ends securely. Trim away the excess, and enjoy!
12 Comments
 How cute is this crochet watermelon bag? Children, as well as adults, will love carrying this adorable bag. Scroll to the bottom of this post for a video tutorial. CLICK HERE TO PURCHASE AN AD-FREE PRINTABLE PDF COPY OF THIS PATTERN. Supplies -Red Heart Super Saver Yarn in the colors red, green, and white. You can also use pink in place of the red. -5mm hook -yarn needle -black pony beads -scissors Abbreviations Used (US terms) ch= chain sc= single crochet inc= increase MC= magic circle BLO= back loop only How to add beads If you would like a video tutorial on this, scroll all the way down to the bottom of this post. Before you begin working with the red/pink, thread 60 beads onto your yarn. Begin crocheting. When you want to add a bead, bring the bead all the way down to your crochet hook. Make your sc as you normally would, working around the bead. The bead will be on the backside of your work. Simply use your fingers, and press it through the stitch, to the front. PATTERN If you do not want to use a MC, simply ch2, and start working in the 2nd chain from the hook. Bag Base Green (Make 2) 1: 6sc in a MC (6) 2: inc around (12) 3: sc, inc. repeat around (18) 4: scx2, inc. repeat around (24) 5: scx3, inc. repeat around (30) 6: scx4, inc. repeat around (36) 7: scx5, inc. repeat around (42) 8: scx6, inc. repeat around (48) 9: scx7, inc. repeat around (54) 10: scx8, inc. repeat around (60) Finish off. Make another base, but do not finish off. After completing the second base, hold the two pieces together, wrong sides together, and single crochet in each stitch around. 11: BLO sc around (60) 12-16: sc around (60) Change to white 17-19: sc around (60) Change to red. Thread 60 black pony beads onto your yarn. I add beads every other row, using 6 beads around the row. 20: Do not use beads this round. sc around (60) 21-34: Use beads. sc around (60) 35&36: Do not use beads. Sc around (60) 37: (ch2, skip 2, scx2.) repeat around 38: sc around, placing 2 sc in the ch2 spaces. (60) 39&40: sc around (60) Finish off. Drawstring Red Ch 120. Sc in the 2nd from the hook, and across. Finish off, leaving a long tail. Weave the strap in and out of the ch2 spaces from round 37. (Both ends will be coming out of the same chain 2 space). Strap Ch 140 (chain less if you want the strap shorter, more if you want it longer) 1: sc in 2nd ch from the hook, and across (139) 2-4: ch1 and turn. Sc in each stitch across. (139) Stitch the ends of the handle onto the bag, making sure to not stitch over the chain two spaces where the drawstring goes. Enjoy! 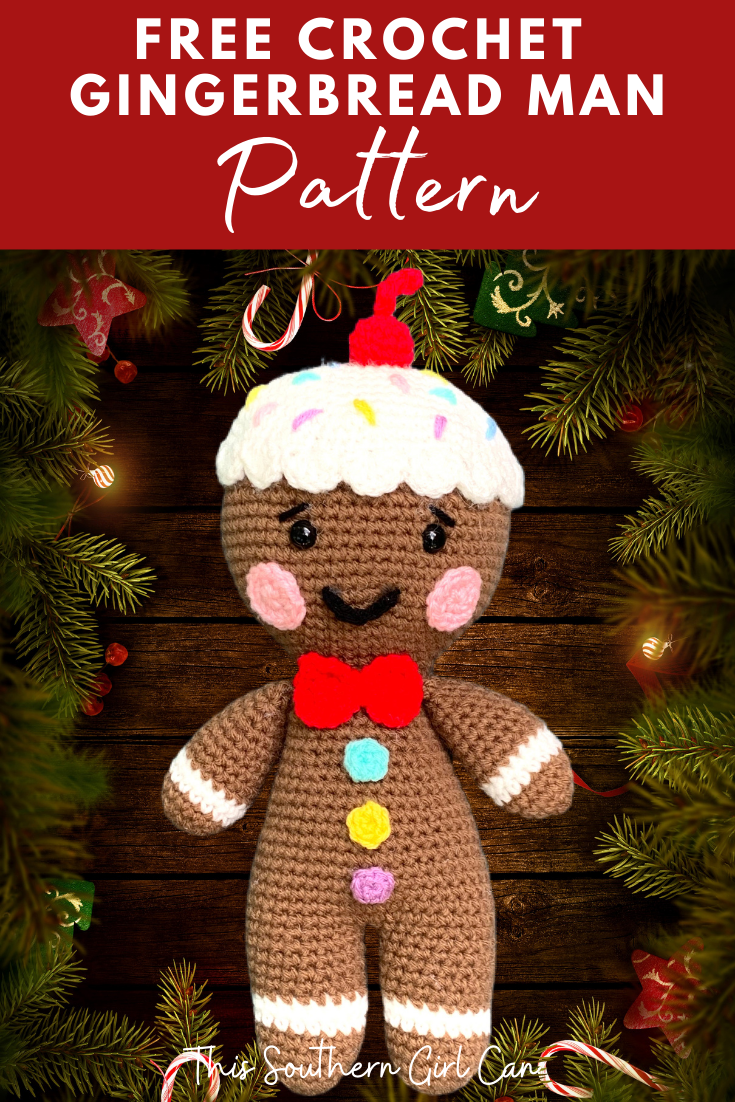 Don't you just love gingerbread men? I sure do. I love decorating with them, and baking the real ones with my Littles. Did you know that gingerbread dates back to the 15th century? It wasn't until the 16th century that figural cookies resembling our modern day gingerbread men were created. The first actual documented use of 'gingerbread men' was in the courts of Elizabeth I of England. She ordered the little gingerbread figures to be created in the likeness of her most important guests. This cute little crochet gingerbread man is sure to put everyone in the holiday spirit. There are ads on this page, because they help to keep this blog running. It also takes time and money to create patterns. If you would like a printable PDF file that is ad-free, please check it out here: GINGERBREAD MAN PATTERN PDF I work very hard on my printable patterns, and appreciate anyone who purchases one. Once purchased, you can print out as many copies as you like. Just please do not give them out. Supplies Needed: -4.5mm crochet hook -Yarn needle -Scissors -Red Heart Super Saver yarn in the colors Soft White, Cafe Latte, Pink, Black, and Hot Red. Use your choice of colors for the buttons and sprinkles. - polyester fiberfill stuffing -16mm black safety eyes, or whatever size and color you prefer Abbreviations Used (American Terms): Sc= single crochet Ch= chain SlSt= slip stitch Dec: decrease MC= magic circle Inc= increase (work 2 stitches into the same stitch) Notes I always prefer to start projects worked in the round with a magic circle. If you do not prefer this method, simply chain 3, and join with a slip stitch. Chain one, then proceed with making the piece. When assembling the icing, cherry, buttons, and other decorations, you may stitch them on, or simply use a bit of hot glue or fabric glue to keep them in place. Legs, Head, and Body. Worked as one piece. Worked in the round. Do not join at the end of each round. Stuff the piece firmly as you go. Color: Cafe Latte Round 1: MC, ch1, scx6 (6) Round 2: Inc in each stitch around. (12) Round 3: Sc, inc. Repeat all the way around. (18) Round 4: Scx8, inc. Repeat. (20) Rounds 5 & 6: Sc around. (20) Change color to Soft White Rounds 7 & 8: Sc around (20) Change color to Cafe Latte Rounds 9-14: Sc around (20) Finish off. Make leg number 2, but DO NOT finish it off. Join the 2nd leg to the 1st leg with a slst. You will make the joining sl st in the stitch after the last stitch made on the 1st leg. Refer to photo at the end of the pattern if you need help. Round 15: Scx39, inc. You have now connected the 2 legs. (41) Round 16: Inc, scx18, inc, sc, inc, scx19. (44) Rounds 17-19: Sc around. (44) Round 20: Scx11, dec, scx20, dec, scx9. (42) Rounds 21 & 22: Sc around. (42) Round 23: Scx12, dec, scx18, dec, scx8. (40) Round 24: Scx10, dec, scx18, dec, scx8. (38) Rounds 25 & 26: Sc around. (38) Round 27: Scx11, dec, scx16, dec, scx7. (36) Round 28: Sc around. (36) Round 29: Scx7, dec. Repeat all the way around. (32) Round 30: Scx14, dec. Repeat. (30) Rounds 31 & 32: Sc around. (30) Round 33: Scx3, dec. Repeat all the way around. (24) Rounds 34-36: Sc around. (24) Round 37: Scx3, inc. Repeat all the way around. (30) Round 38: Scx4, inc. Repeat all the way around. (36) Round 39: Scx5, inc. Repeat all the way around. (42) Round 40: Scx6, inc. Repeat all the way around. (48) Round 41: Scx7, inc. Repeat all the way around. (54) Round 42: Scx8, inc. Repeat all the way around. (60) Rounds 43-53: Sc around. (60) Insert safety eyes between rounds 46 & 47, with roughly 8 stitches between them. Round 54: Scx8, dec. Repeat all the way around. (54) Round 55: Scx7, dec. Repeat all the way around. (48) Round 56: Scx6, dec. Repeat all the way around. (42) Round 57: Scx5, dec. Repeat all the way around. (36) Round 58: Scx4, dec. Repeat all the way around. (30) Round 59: Scx3, dec. Repeat all the way around. (24) Round 60: Scx2, dec. Repeat all the way around. (18) Round 61: Sc, dec. Repeat all the way around. (12) Round 62: Decx4. Fasten off, leaving a 12 inch tail. Using a yarn needle, weave the yarn in and out of the remaining stitches, and pull tight to close. Fasten off. Work away the end. Arms (Make 2) Color: Cafe Latte Round 1: MC, ch1, scx6. (6) Round 2: Inc in each stitch around. (12) Round 3: Sc, inc. Repeat all the way around. (18) Round 4: Sc around. (18) Change color to Soft White Round 5: Sc around. (18) Round 6: Sc around. (18) Change color to Cafe Latte. Rounds7-9: Sc around. (18) Round 10: Scx7, dec. Repeat. (16) Round 11: Sc around. (16) Round 12: Scx6, dec. Repeat. (14) Round 13: Sc around. (14) Round 14: Scx5, dec. (12) Round 15: Sc around. (12) Finish off, leaving a long tail for sewing them to the body. Frosting Hat Round 1: MC, ch1, scx6. (6) Round 2: Inc in each stitch around. (12) Round 3: Sc, inc. Repeat all the way around. (18) Round 4: Scx2, inc. Repeat all the way around. (24) Round 5: Scx3, inc. Repeat all the way around. (30) Round 6: Scx4, inc. Repeat all the way around. (36) Round 7: Scx5, inc. Repeat all the way around. (42) Round 8: Scx6, inc. Repeat all the way around. (48) Round 9: Scx7, inc. Repeat all the way around. (54) Round 10: Scx8, inc. Repeat all the way around. (60) Round 11: Scx9, inc. Repeat all the way around. (66) Rounds 12 & 13: Sc around. (66) Round 14: Sl st into the next stitch. *Skip a stitch, 5DC in the next stitch. Skip a stitch, sl st into the next stitch. Repeat from * all the way around, and finish off. Use scraps of different colors of yarn to stitch on ‘sprinkles’. Cheeks (Make 2) Color: Pink Round 1: MC, ch1, scx6. (6) Round 2: Inc in each stitch around. (12) Finish off. Buttons (Make 3) Color: Various colors of your choice MC, ch1, scx6. Finish off. Mouth Color: Black Chain 7, finish off. Bow Tie Color: Hot Red Chain 8. Row 1: Sc in 2nd stitch from hook, and across. Ch 1 and turn. (7) Rows 2-4: Sc in each stitch across. Ch 1 and turn. (7) Sc in each stitch all the way around the entire piece, putting 3 sc in each corner. Finish off. Wrap a long piece of yarn around the center of the piece to give it a bow tie shape. Knot the ends, and leave a long tail if you wish to sew it to your gingerbread man. If you plan to glue it on, trim the ends off. Cherry Color: Red Hot Leave a long tail (about 18 inches) of yarn at the beginning, and use this to stuff the inside of the cherry. Round 1: MC, ch1, scx6. (6) Round 2: Inc, sc. Repeat all the way around. (9) Round 3: Inc, sc. Repeat all the way around. (14) Rounds 4&5: Sc around. (14) Round 6: Dec, sc. Repeat all the way around. (9) Round 7: Dec, sc. Repeat all the way around. (6) Finish off, and using a yarn needle, weave the yarn back and forth through the stitches of the last row. Pull tight to close the end. Stem: Ch9. Sc in 2nd chain from the hook, and in each of the remaining chains. Finish off, leaving a long tail for sewing. With a yarn needle, thread the yarn through the top of the cherry, and out through the bottom. Secure to the bottom of the cherry, and finish off. Assembly 1: Sew the arms to the body between rows 35 and 36. 2: Sew or glue the cherry to the top of the frosting hat. 3: Sew or glue the frosting hat to the top of the gingerbread man’s head. 4: Sew or glue the cheeks to the face. 5: Sew or glue the bow tie to the front of the neck. 6: Sew or glue the buttons down the front of the body. 7: Sew or glue the mouth to the face. 8: With a strand of black yarn, stitch on eyebrows above the eyes if you like. ENJOY! |


